24 Carrot Camel

1 08 2011

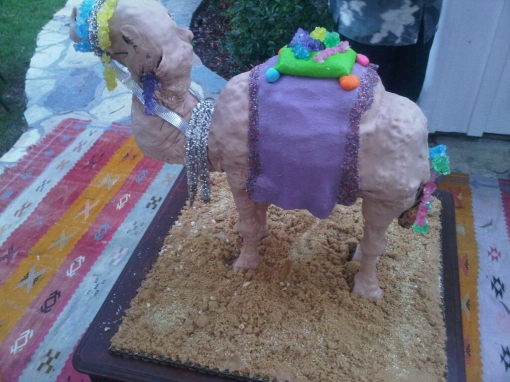
So my friend Adam was having his 40th birthday and I offered to make him a special cake. Little did he know what he was in for and little did I remember why I always open my big mouth!!! After he informed me it was Moroccan themed I immediately thought camel. Oh no I couldn’t just stop at a cute Moroccan stacked cake or a Moroccan lantern or a Moroccan pillow. I had to do a standing fucking camel!! Pardon my Moroccan.

So the journey across the desert dessert began.

Adam wanted a carrot cake and since it’s one of my faves I quickly agreed. Instead of cream cheese frosting though I went with browned butter frosting. It’s one of my favorite frostings and it couples well with carrot.

I made the trek across the  Los Angeles desert in my hummer to Home Depot. I scoured the aisles to figure out how I’d build the supporting structure and decided upon the plumbing aisle. I spotted that orange apron in all it’s glory and asked the knowledgeable employee what his opinion was. After his look of disgust he suggested floor flanges and I said “funny that’s my knickname”. He wasn’t amused attall.  Soon everyone was in on the planning. Pedro the plumber showed me how to connect the pipes and that’s a sentence I never pictured writing. So off and running I was. I got my lumber, check, floor flanges, check, 1/2 inch pvc, check, screws, check. This sounds like a bad porno.

For all my cake supplies in Los Angeles I go to http://gloriascakecandysuplys.com/store/

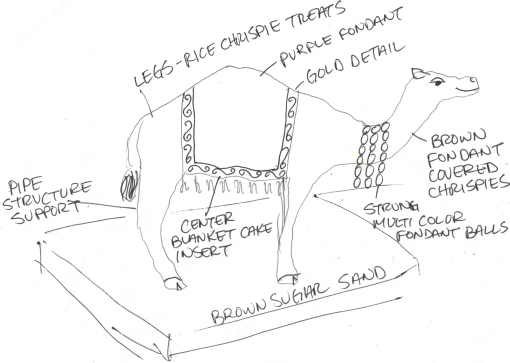
My design

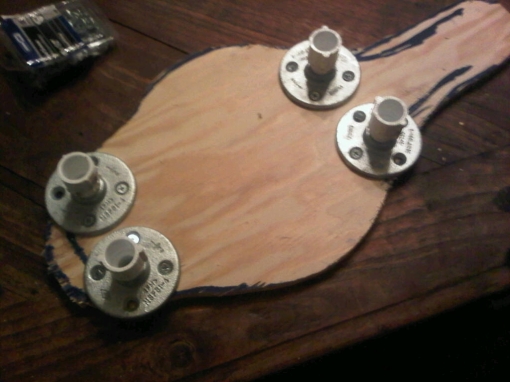
I cut a stencil around my cake pans and used a jigsaw to cut it out. I screwed my flanges in with my pipe couplers.

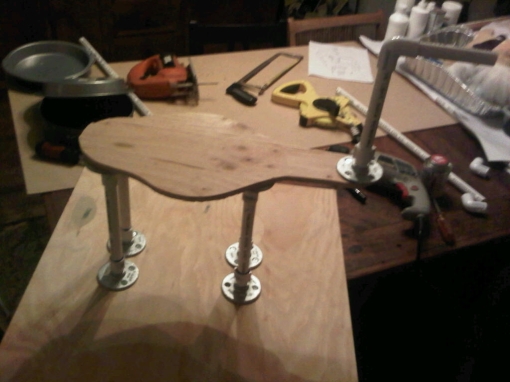
Next I eyeballed the pvc size and cut them down with a hack saw.

I glued the pipes in and then connected the neck and head piece.

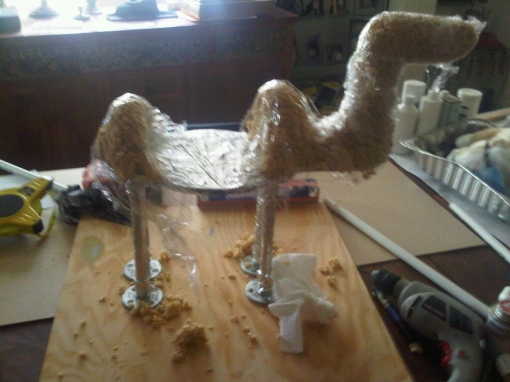
This is where I would’ve changed the inside structure. I used rice krispie treats to form the head and neck as well as

parts of the body. I wish I would’ve used modeling chocolate because the treats weren’t strong enough to support the icing and fondant. I ended up making it work but I had to remove the head once and wrap it in foil. Actually if you’re not a purest the foil would’ve been fine for the inside structure and then modeling chocolate over that. Alas we live and learn.

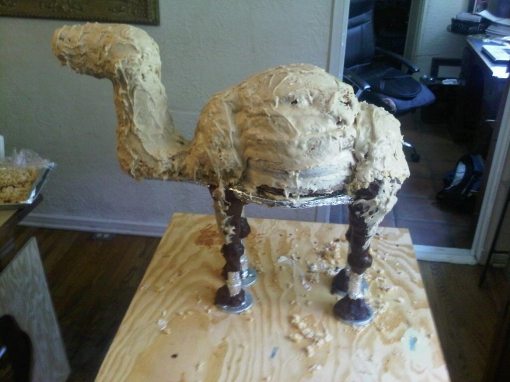
I used modeling chocolate for the legs and inserted the 4 layer carrot cake/hump in the center. I used the giant cupcake mold for the hump and cut it down.

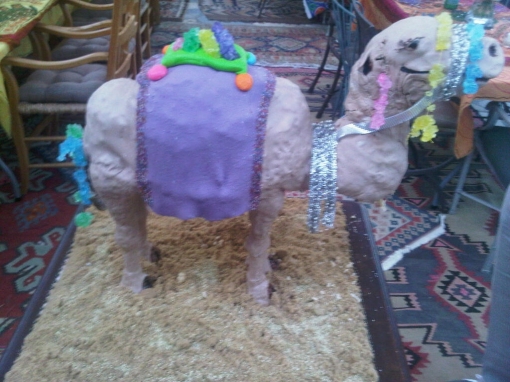
I covered the entire camel in browned butter frosting. It looks messy but fondant was layered on top  so it didn’t matter much. The bumpyness created a texture for the camel fur.

Here she is in all her glory! I decorated her with a fondant rug that  I outlined in multicolor sugar. I used strung colored rock candy to bedazzle her and the pillow is marshmallow fondant with more rock candy on top. I cheated a bit with the non eatables and used beaded ribbon around her neck. Every girl needs some real jewelry right??

The cake board/plywood is outlined with black & gold rick rack and the sand is brown sugar dusted with eatable gold leaf sugar.

The pics aren’t great because  they’re from my phone. If I get more pics I will post here.

Below is the recipe & intructions for the Carrot cake. It turned out YUMMY . Also below is a recipe for my browned butter frosting and marshmallow fondant! Enjoy!

Cake feeds 32 people in four large layers.

  • 12 cups grated carrots
  • 2 cups brown sugar
  • 2 cups raisins
  • 8 eggs
  • 3 cups white sugar
  • 2 cups vegetable oil
  • 1 tablespoon and 1 teaspoon vanilla extract
  • 2 cups crushed pineapple, drained
  • 6 cups all-purpose flour
  • 1 tablespoon baking soda
  • 2 teaspoons salt
  • 2 tablespoons and 2 teaspoons ground cinnamon
  • 2-3/4 cups and 3 tablespoons chopped walnuts

Directions

This recipe’s Ingredients were scaled to yield a new amount. The directions below still refer to the original recipe yield of 2 – 10 inch round layers.
  1. In a medium bowl, combine grated carrots and brown sugar. Set aside for 60 minutes, then stir in raisins.
  2. Preheat oven to 350 degrees F (175 degrees C). Grease and flour two 10 inch cake pans.
  3. In a large bowl, beat eggs until light. Gradually beat in the white sugar, oil and vanilla. Stir in the pineapple. Combine the flour, baking soda, salt and cinnamon, stir into the wet mixture until absorbed. Finally stir in the carrot mixture and the walnuts. Pour evenly into the prepared pans.
  4. Bake for 45 to 50 minutes in the preheated oven, until cake tests done with a toothpick. Cool for 10 minutes before removing from pan. When completely cooled, frost with cream cheese frosting.
Browned Butter Frosting
I used this recipe  x 2 for this cake alone.
1/2 c. butter
4 c. powdered sugar
2 tblspn milk
1 tsp. vanilla
in a saucepan melt the butter. constantly stirring and watching until it turns  brown. it will happen all of a sudden about 4 minutes in. You’ll see it happen as you’re swirling the butter. Take pan off heat once this happens and empty contents into a mixer. Add all ingredients and mix. Add more milk or corn syrup to make different consistency.
Marshmallow Fondant
16oz mini marshmallows
2lbs of powdered sugar
Place marshmallows in a microwave bowl. Add a few tablespoons of water and micro on high for about 1-2 minutes. Take out and stir. If not completely melted stick back in micro for 30 second intervals, mix and repeat until thoroughly melted to a gooey mess. Add color or flavor now before the sugar. Add the powdered sugar and keep stirring until too difficult. Powder your hands in the sugar and knead like dough until it stops sticking. Note: it will still be slightly sticky when pulled apart. generously powder your work surface and rolling pin and roll out to your desired shapes. Keep sealed in airtight ziploc . Best when used right away. If it gets too hard to work with, place in
micro for 20-30 seconds until pliable.


It’s That Time Of Year…

4 11 2010

to get depressed! I don’t know about you but as much as I am happy around the holidays, I get a little depressed too.  Soooo there’s nothing like a cookie to cure that depression! Matter of fact these recipes may have come from the depression era! Most likely they’ve been around well before that, but my Great Grandma was definitely apart of the depression era and she introduced them to me.

Now I’m introducing them to the LA Times Cookie Bake off Contest and to you bloggers!!

Click here to vote for me!!>>>>

http://upickem.net/3VNBcA1H4bZ?r=37960

I’m entered in the LA Times  Cookie Bake Off with my families cookie recipe called Aunt Goldie’s Date Filled Nuggets.

Every year my Great Grandma Jessie Olson would make this family recipe and  I was always the first to finish them.  Grandma Jessie was an amazing baker. Every Christmas she’d bring over huge tupperware containers filled with different cookies as well as several of her famous pies. My two favorite cookies of hers were her Molasses Iced Cookies and her Date cookies.

Little did I know a lot of the recipes were handed down or were altered by other people in our family. I found all of this out when my Grandma Pearl died and left me all of the family recipes. The books are priceless and contain years and years of recipes by my family. A lot of them quickly written down with no complete instructions!!  I guess they cooked and baked so much they just needed the ingredients. Although I noticed that some of the recipes are clearly missing some ingredients. Luckily I learned from the best so it was pretty much common sense that you can’t make a cookie without flour.

And now to set the mood here is one of my favorite Christmas songs.

My entry into the LA Times contest is the following recipe for Aunt Goldies Date Filled Nuggets which Grandma Olson perfected every Christmas.

Aunt Goldie’s Date Filled Nuggets

4 1/2 C. All Purpose Flour
1 1/2 C. Sugar
1 C. Butter (Soft)
1 tsp. Vanilla
2 Eggs
1/2 C. Sour Cream
1 Tsp. Baking Soda
1/2 Tsp Salt
1 Tsp. Baking Powder

Date Filling
1 lb. Dates diced (or in food processor)
1 C. Sugar
1 1/2 C. Water
Boil all until soft & in paste form. Let cool in the refrigerator.

Cream Butter & Sugar then add eggs one at a time. Mix Soda into Sour Cream and add. Stir flour, baking powder and salt in a separate bowl and add little by little to wet ingredients.
You may chill dough or roll out on a floured surface immediately.
Use a 2 inch round cookie cutter to cut out rounds or a round juice glass floured. Cut an even number of rounds and place a dollop of date filling on half. Cover those with the other half of cut outs and pinch all sides by hand or fork. Place on an ungreased cookie sheet. Bake at 350 f. until golden brown (about 10-15 mins.) Continue until all the dough and/or filling is used.

AND!! To get plenty of good cheer I eat Aunt Goldie’s Minted Nuts!!

Here’s a recipe for Aunt Goldie’s nuts exactly like my Grandma Pearl wrote it down.  I love that my Grandma instructs to stir in a circular motion! Wait until you see some of the other recipes she wrote down. Grandma Pearl often wrote in phonetics like her recipe for Chile Con Queso she writes Chilly Con Kay-so…

recipeAuntGoldiesMintedNuts.jpg Aunt Goldie's Minted Nuts picture by cornbeefonry